Good Morning to you,


I then,

I then


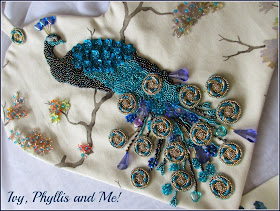
....... I've done it! It was touch and go as to whether I would finish my project.... but finish it, I have.
I have beaded and sewn until my fingers are so very sore, but I am so very proud of what I have achieved.

This is the top
and

this is the bottom.
I have made the most fabulous
Hostess Pinnie.
I just felt it was the perfect thing to make,
because I always wear pinnies when I cook
and as Natasha and Danielle pointed out to me,
I am always saying,
"Now it is on with the pinnie".
I just felt it was the perfect thing to make,
because I always wear pinnies when I cook
and as Natasha and Danielle pointed out to me,
I am always saying,
"Now it is on with the pinnie".

Here is a closer look at the head of my proud peacock. I had intended to use sequins, but I found the most gorgeous tiny beads, tucked away in one of my tins, which look perfect. It took me five hours to sew these little lovelies in place.

I used invisible thread to attached the flowers and centre beads, and I have to tell you, invisible thread is not the easiest thread to work with, but the results are perfect.

....and here are the finished tail feathers. I think you will agree that they look just a little fabulous.

You can see much better in this photograph that there is not a thread in sight.
I had intended to take a photograph with me wearing the pinnie, when George returned from his walk, but the weather became so grey and overcast, that the inside of the house grew quite dark, so I had to act straight away and could not wait for George to return. So I laid the pinnie on the table, but I could not get the whole pinnie in the photograph. So it is a pinnie of two halves.
Now as part of the Hillarys Blinds Country Craft Competition I need to tell you how I made my pinnie.
HOW I MADE
MY
MY
HOSTESS PINNIE

I cut a heart template out of baking parchment,
for the top of my pinnie.
I then cut three heart shapes.
The first in the Bird Parade material,
the second in a cotton
the third in a cream backing fabric.
I tacked the Bird Parade material
to the cotton material,
as I find this give the beads stability.
I then started my bead work.
When the bead work was finished.

I placed the backing fabric onto the finished beaded
Bird Parade fabric
and machine stitched.
I left a 4" gap either side of the base of
the heart to enable the heart to be turned
inside out.
Before turning inside out, I snipped the edges of the heart.
This allows the seams to lay flat,
when turned inside out.
when turned inside out.
I then cut an oblong shape 20" depth x 27 width
for the lower half of the pinnie,
from the Bird Parade material,
for the lower half of the pinnie,
from the Bird Parade material,
and

I machine stitched the two sides and bottom
of the Bird Parade material,
(the bottom being the hem)

I folded the Bird Parade material in half to find the centre
and marked the centre with a pin.
Using a running stitch, I stitched 3" either
side of the centre point.
Then I pulled the running stitch to create little gathers.

I then,
cut 4 x 23" by 2" pieces of material
for the ties
at the waistband
and the neck.
I then folded each piece in half and machine stitched.
I left the top section open
so that I could turn the ties inside out.
I then pressed the ties
and stitched the openings.
I attached one set to the top of the pinnie
to tie around the neck.
I attached one set to the top of the pinnie
to tie around the neck.

I then
cut a waistband,
25" in width and 5" in depth
and folded in half, length ways
and

top stitched the two sides and top of the waistband.
Here you will notice my mistake.
I should have attached my ties before I stitched
the sides of my waistband.
So yes, this stitching was unpicked, and the
ties attached and then restitched.
I just forgot to take a photograph,
but you will see the correct version below.

I attached the waistband to the lower part
of the pinnie.
As you can see I could not resist a little embellishment.

Then I stitched the bib
to the

pinnie
and if I have not missed
out any instructions
you should
have,
at this point,
the
most
fabulous
Hostess Pinnie
Oh I do hope so!


of the pinnie.
As you can see I could not resist a little embellishment.

Then I stitched the bib
to the

pinnie
and if I have not missed
out any instructions
you should
have,
at this point,
the
most
fabulous
Hostess Pinnie
Oh I do hope so!
Now, it is in the lap of the Gods..... I have to tell you I really enjoyed making this pinnie..... but I think I will not be doing any beading for a little while.
I am now free to catch up with you, so I promise I will be replying to your comments in the next couple of days and I will also be out and about visiting you again.
I am now going to soak my hands in lavender water.
Take care and I will see you on Wednesday.
This week I will be joining,
This week I will be joining,
No comments:
Post a Comment
Dear Friends,
It is so wonderful to know you enjoy reading Ivy, Phyllis and Me! Thank you so much for taking the time to leave me a comment. I really do appreciate it.
Best wishes to you.
Daphne